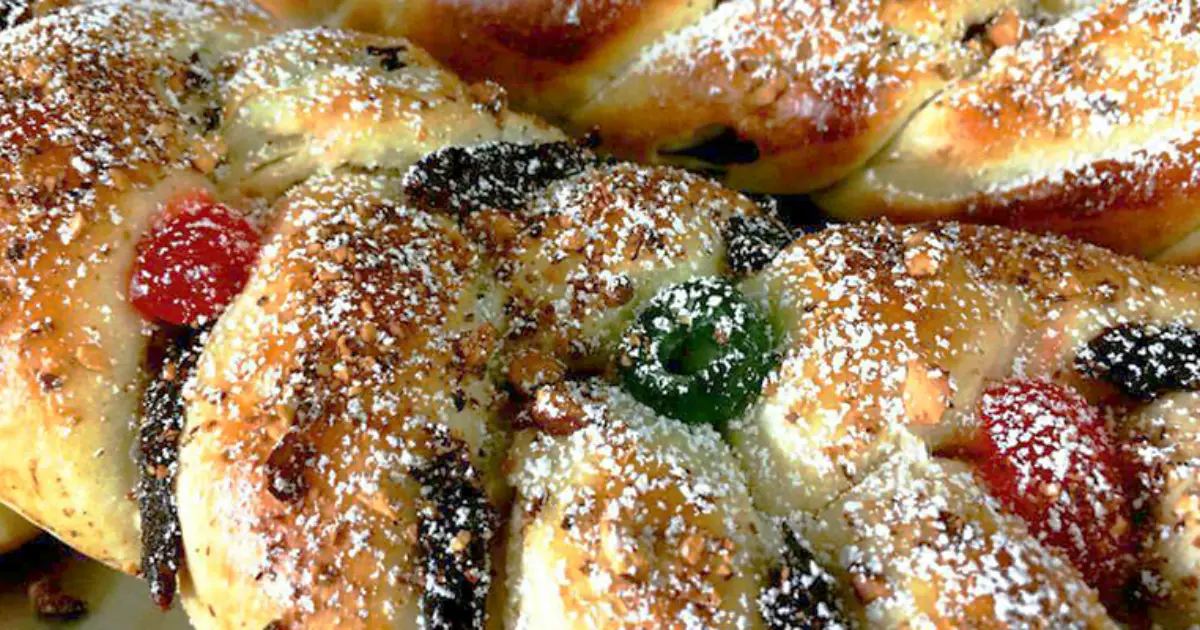
Trenza Dulce: Guatemala’s Iconic Christmas Bread
Discover Trenza Dulce
In the highlands of Guatemala, where volcanic peaks frame cobblestone streets adorned with pine needles and poinsettias, the aroma of freshly baked bread signals the arrival of Christmas. Among the constellation of holiday dishes that define Guatemalan gastronomy, few carry the emotional weight of trenza dulce—a braided sweet bread that has anchored family celebrations for generations. This isn’t merely a dessert; it’s edible heritage, a recipe passed through hands and whispered between generations.
The trenza dulce represents something profound about Central American culinary identity: the seamless fusion of European baking traditions with indigenous ingredients and tropical abundance. Its golden, sugar-dusted surface conceals a heart of cinnamon-laced apples and plump raisins, each bite a meditation on the flavors that define Guatemalan Christmas. For those exploring authentic Central American cuisine, resources like Guatemala Food offer invaluable cultural context that transforms simple recipes into meaningful culinary experiences.
Ingredients Deconstructed
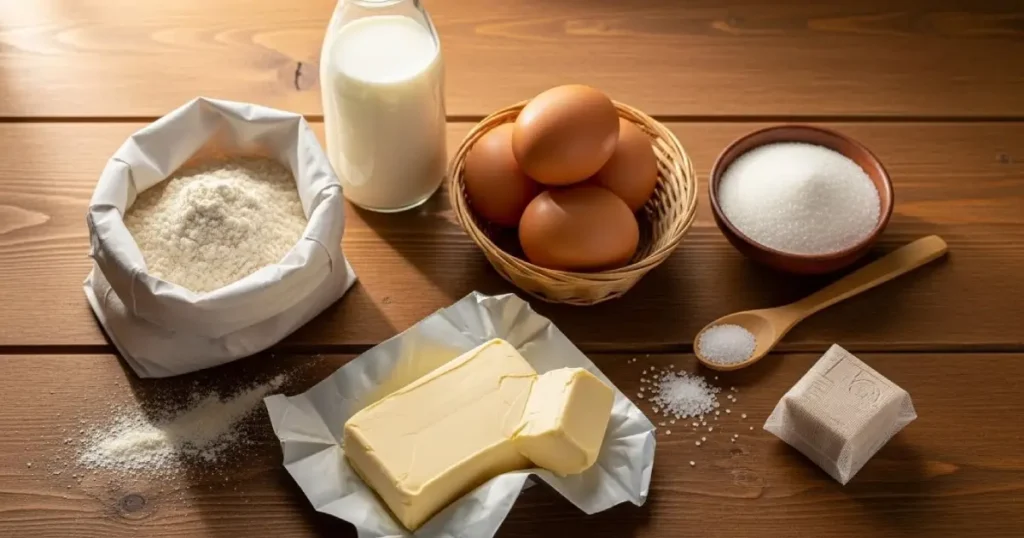
Understanding each ingredient’s role transforms recipe-following into genuine craftsmanship. The trenza dulce depends on specific components working in concert, and substitutions should be made thoughtfully.
The Dough Foundation
Hard Flour (Harina Dura) – 500 grams: This high-protein flour, typically containing 12-14% protein, develops the strong gluten network necessary to contain filling without tearing. In the United States, bread flour serves as an appropriate substitute. All-purpose flour can work but may produce a more fragile result.
Fresh Yeast – 40 grams: Fresh yeast, also called cake yeast or compressed yeast, provides reliable fermentation with a mild, slightly sweet flavor. If unavailable, substitute approximately 15 grams of active dry yeast or 12 grams of instant yeast, adjusting hydration slightly to compensate.
Milk – 1 liter: Milk contributes fat, protein, and lactose that enhance browning, texture, and flavor. Water can substitute but produces a leaner, less tender result. The liquid should be lukewarm (around 37°C/98°F) to activate yeast without killing it.
Whole Eggs – 4 large: Eggs provide structure, richness, color, and emulsification. The lecithin in yolks helps create a finer, more uniform crumb, while proteins contribute to the dough’s strength.
Margarine – 1/2 stick (approximately 60 grams): Fat tenderizes the dough by coating gluten strands, preventing them from developing into tough networks. Butter can substitute, offering superior flavor at the cost of slightly different texture.
Sugar – 40 grams: Beyond sweetness, sugar feeds yeast, promotes browning, and helps retain moisture in the finished bread.
Salt – 1/2 teaspoon: Salt strengthens gluten, controls fermentation rate, and enhances overall flavor. Never omit it, though you may adjust quantity slightly to taste.
The Sweet Filling
Apples: Firm, slightly tart varieties like Granny Smith hold their shape better than softer apples during baking. Dice uniformly for even distribution.
Cinnamon: Use true Ceylon cinnamon if available for its delicate, complex flavor, though cassia cinnamon (more commonly sold in the US) works adequately.
Raisins: Standard dark raisins provide chewy texture and concentrated sweetness. Soaking briefly in warm water or rum before use plumps them and prevents them from drawing moisture from surrounding dough.
Crystallized Fruit: Traditional recipes call for mixed crystallized (candied) fruit, adding color, texture, and intense sweetness. Quality varies dramatically; seek versions that taste of actual fruit rather than merely sugar.
Fruits in Syrup (Frutas en Almíbar): These add tropical sweetness but introduce moisture concerns. Drain thoroughly and pat dry before incorporating.
Powdered Sugar (Azúcar Glass): Used both within the filling and as final dusting, this adds sweetness without grittiness.
Finishing Components
Egg Wash: Beaten egg mixed with a pinch of sugar creates the golden, glossy crust characteristic of properly baked trenza dulce. The sugar accelerates browning and adds subtle sweetness to the exterior.
Decorative Toppings: Seeds (sesame, poppy), additional crystallized fruit, or coarse sugar can be applied before baking for visual appeal and textural contrast.
Step-by-Step Preparation Guide
The following instructions synthesize traditional Guatemalan technique with practical guidance for home bakers. Read through entirely before beginning.
Phase 1: Creating the Dough
Step 1 – Prepare the Volcano: Place 500 grams of hard flour on a clean, flat work surface (a large wooden board or clean countertop works well). Create a mound and use your fist to form a deep well in the center, resembling a volcano crater. Reserve approximately 50 grams of flour nearby for dusting and adjustments.
Step 2 – Activate the Yeast: In the center well, crumble 40 grams of fresh yeast. Add 40 grams of sugar and approximately 100ml of lukewarm milk. Using your fingers or a fork, gently mix these central ingredients without disturbing the flour walls. Add the 4 eggs to this mixture and incorporate gently.
Step 3 – Initial Fermentation: Allow this wet mixture to rest undisturbed for 15 minutes. During this time, the yeast activates and begins producing carbon dioxide, creating small bubbles visible on the surface. This step is crucial—do not skip or abbreviate it.
Step 4 – Gradual Incorporation: After 15 minutes, begin drawing flour from the inner walls of the volcano into the wet center, working gradually and adding remaining milk as needed to maintain a workable consistency. Continue until a shaggy dough forms and the well structure collapses.
Step 5 – Add Fat and Salt: Once the dough comes together roughly, incorporate the margarine and salt. These additions would inhibit yeast activity if added earlier, which is why they’re introduced at this stage.
Step 6 – Knead Vigorously: Transfer the dough to a lightly floured surface and knead forcefully for 10-15 minutes. The dough should transform from rough and sticky to smooth, elastic, and slightly tacky. It should pass the “windowpane test”—a small piece stretched thin should become translucent without tearing.
Step 7 – First Rise: Form the dough into a smooth ball and place it in a lightly oiled bowl. Cover with a damp cloth (this prevents surface drying) and set in a warm location. Allow to rise for one hour or until doubled in volume.
Phase 2: Preparing the Filling
While the dough rises, prepare the filling components:
Step 8 – Process the Fruit: Peel and dice apples into uniform small cubes (approximately 1cm). Combine with raisins, crystallized fruit (chopped if pieces are large), and any drained fruits in syrup.
Step 9 – Season the Filling: Toss the fruit mixture with ground cinnamon and powdered sugar to taste—typically 1-2 tablespoons of sugar and 1 teaspoon of cinnamon per cup of fruit. The filling should be flavorful but not excessively wet.
Step 10 – Critical Assessment: Evaluate the filling’s moisture content. If liquid pools at the bowl’s bottom, the filling is too wet. Drain excess liquid or add a tablespoon of flour to absorb moisture. Overly wet filling causes structural failure during baking.
Phase 3: Shaping and Assembly
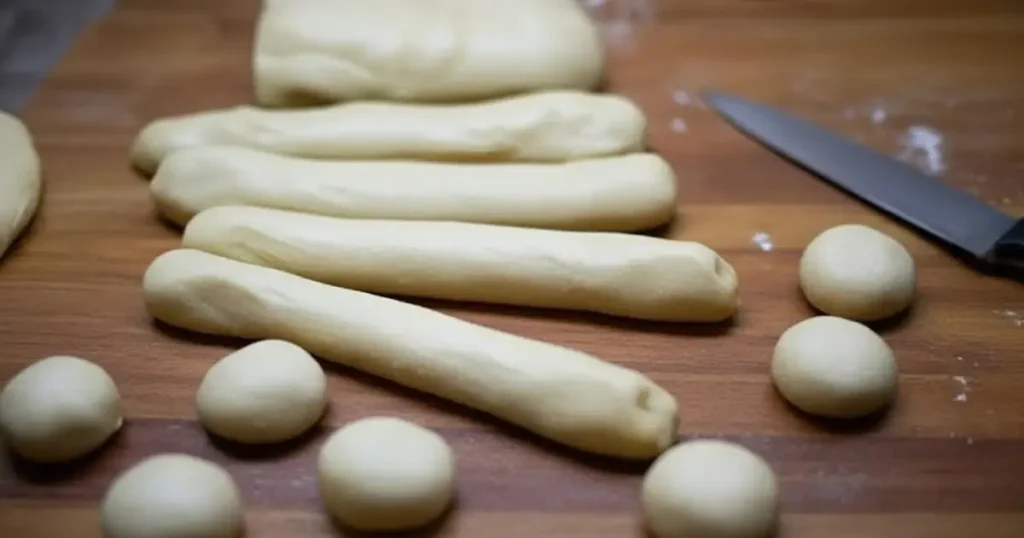
Step 11 – Divide the Dough: Punch down the risen dough to release accumulated gases. Divide into portions appropriate for your desired final size—typically 2-4 pieces for standard loaves.
Step 12 – Roll Out: Using a rolling pin (bolillo), roll each portion into an oval or rectangular shape approximately 1cm thick. The dough should be even throughout; thick and thin spots bake unevenly.
Step 13 – Create Braiding Strips: Using a sharp knife or bench scraper, make diagonal cuts along both long edges of the dough, creating strips approximately 2-3cm wide. Leave a central channel uncut—this holds the filling.
Step 14 – Fill the Center: Distribute filling evenly along the uncut central channel. Remember the guiding principle: less is more. Overfilling guarantees problems. The filling should sit comfortably without mounding excessively.
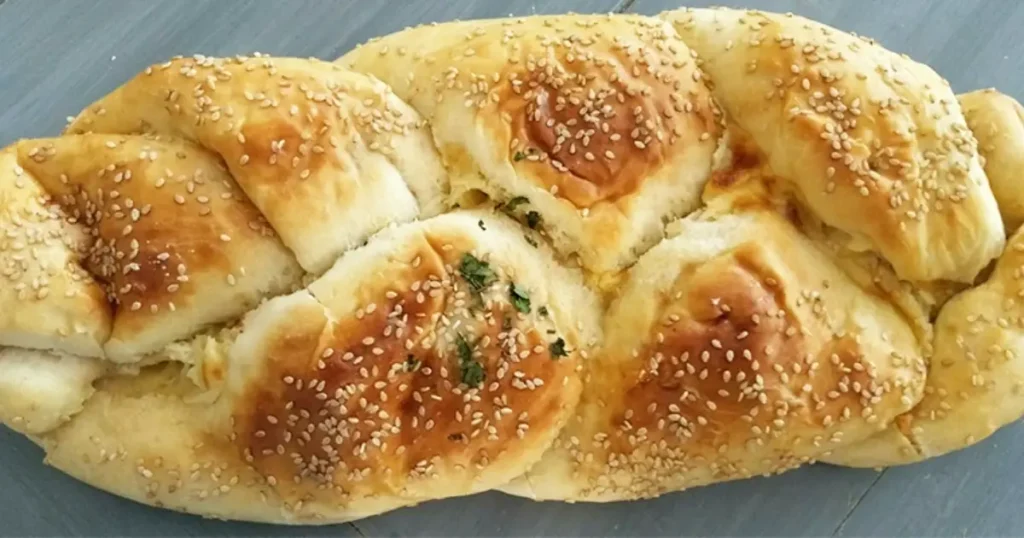
Step 15 – Braid Closed: Fold alternating strips from each side over the filling, creating a braided pattern. Use beaten egg as “glue” to seal each strip, pressing gently to ensure adhesion. The finished braid should completely enclose the filling.
Step 16 – Transfer and Final Proof: Carefully transfer braided loaves to a greased baking sheet. Allow to rest 15-20 minutes while you preheat the oven—this final proof helps the bread recover from handling and rise slightly.

Phase 4: Baking and Finishing
Step 17 – Apply Egg Wash: Beat one egg with a pinch of sugar. Using a pastry brush, coat each braid generously, ensuring coverage reaches into crevices.
Step 18 – Decorate (Optional): Arrange crystallized fruit, seeds, or coarse sugar on top of the glazed braids as desired.
Step 19 – Preheat: Heat your oven to 300°C (570°F) for 15 minutes. This high initial temperature is critical.
Step 20 – Bake: Reduce oven temperature to 250°C (480°F), then immediately place braids inside. Bake for approximately 20 minutes. The bread is done when deeply golden brown and sounds hollow when tapped on the bottom.
Critical Warning: Do not open the oven door during baking. Temperature fluctuations cause the bread to collapse, losing its risen structure and aesthetic appeal. Trust your timer and initial visual assessment through the oven window.
Step 21 – Cool Completely: Remove braids from oven and transfer to a cooling rack. Allow to cool completely—at least 30 minutes—before finishing. Cutting or dusting too early results in gummy texture and melted sugar.
Step 22 – Final Presentation: Once cooled, dust generously with powdered sugar using a fine-mesh sieve for even distribution. The finished trenza dulce is now ready to serve.
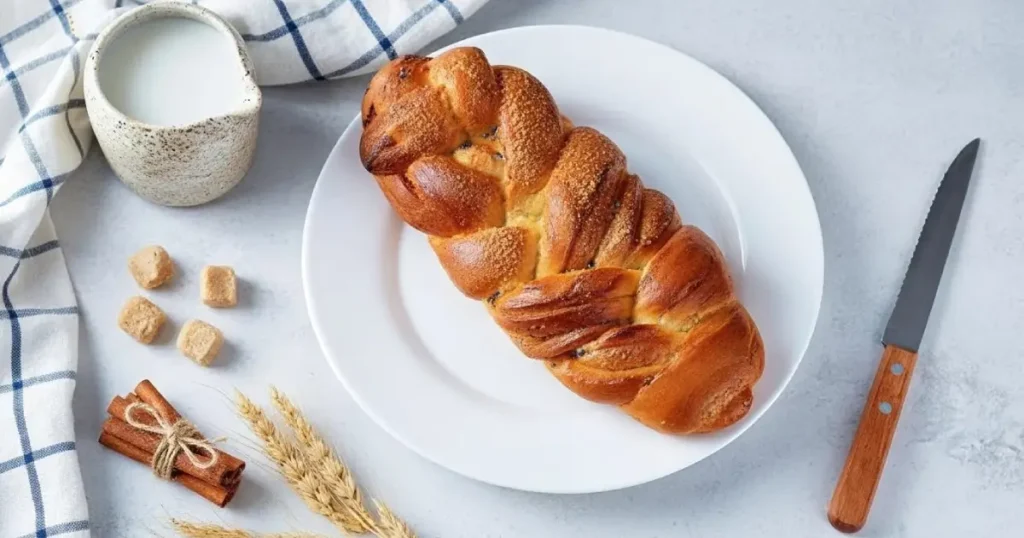
Guatemala’s Beloved Christmas Braided Bread
Trenza dulce embodies what makes food traditions enduring: the intersection of technique, flavor, and meaning. This braided Guatemalan bread transcends its ingredients—flour, yeast, apples, cinnamon—to become a vessel for cultural memory, family connection, and holiday joy. Each golden loaf that emerges from the oven carries forward centuries of tradition, adapted through countless hands yet maintaining its essential character.
Mastering trenza dulce requires patience, attention, and respect for the process. The volcano mixing method, the careful fermentation, the restrained filling, the disciplined baking—each step contributes to the final result. There are no shortcuts that don’t compromise quality, no substitutes for the learning that comes from repeated practice.
This Christmas season, consider adding trenza dulce to your holiday table. The effort required yields rewards beyond the bread itself: the satisfaction of mastering a demanding technique, the pleasure of sharing something handmade, and the connection to a rich culinary tradition that has nourished generations of Guatemalan families.